> For the complete documentation index, see [llms.txt](/llms.txt).
# Smart accounts
Effortlessly create and manage smart accounts for your users with just a few lines of code, using our Smart Account feature. Smart accounts offer enhanced control and programmability, enabling powerful features that traditional wallets can't provide.
**Key features of smart accounts include:**
- **Gas abstraction:** Cover transaction fees for users, or allow users to pay for their own transactions using ERC-20 tokens.
- **Batch transactions:** Perform multiple transactions in a single call.
- **Automated transactions:** Allow users to automate actions, like swapping ETH to USDT when ETH hits a specific price.
- **Custom spending limits:** Allow users to set tailored spending limits.
tip
For more about ERC-4337 and its components, [check out our detailed blog post](https://blog.web3auth.io/an-ultimate-guide-to-web3-wallets-externally-owned-account-and-smart-contract-wallet/#introduction-to-eip-4337).
Our smart account integration streamlines your setup, allowing you to create and manage smart accounts using your favorite libraries like Viem, Ethers, and Wagmi. You don't need to rely on third-party packages to effortlessly create ERC-4337 compatible Smart Contract Wallets (SCWs), giving users the ability to perform batch transactions and efficiently manage gas sponsorship.
note
This is a paid feature and the minimum [pricing plan](https://web3auth.io/pricing.html) to use this SDK in a production environment is the **Growth Plan**. You can use this feature in Web3Auth Sapphire Devnet network for free.
## Enabling smart accounts[](#enabling-smart-accounts "Direct link to Enabling smart accounts")
prerequisite
To enable this feature, you need to configure smart accounts from your project in the [Embedded Wallets dashboard](https://developer.metamask.io/).
### Dashboard configuration[](#dashboard-configuration "Direct link to Dashboard configuration")
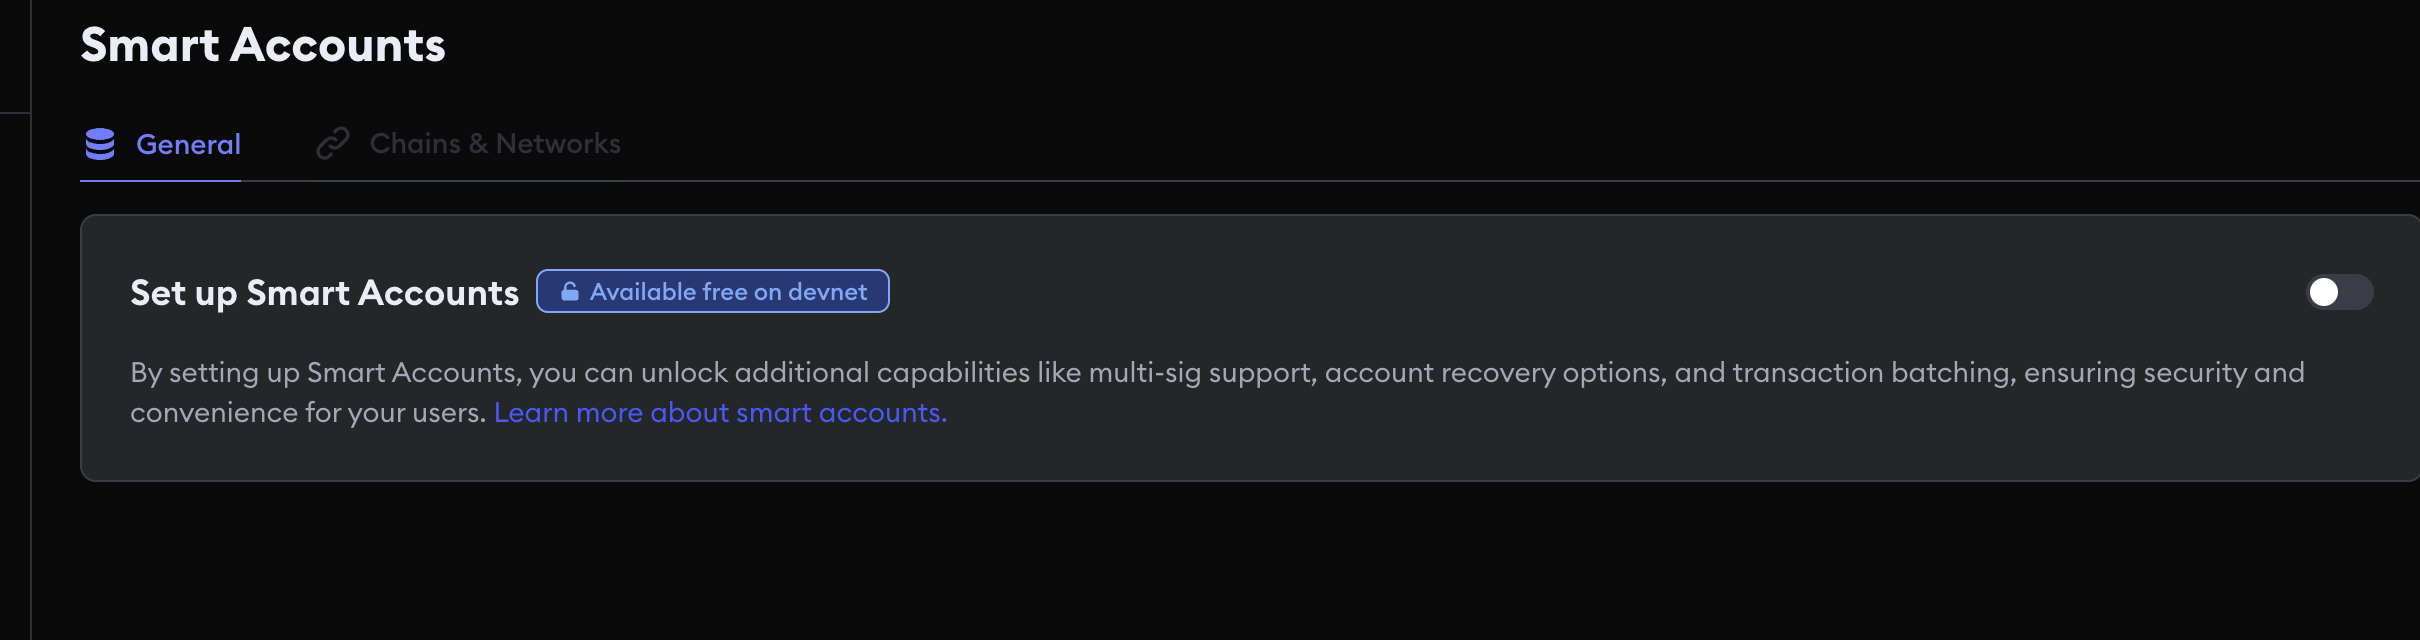
To enable smart accounts, navigate to the smart accounts section in the MetaMask Developer Dashboard, and enable the "Set up Smart accounts" toggle. Web3Auth currently supports [MetaMaskSmartAccount](https://docs.gator.metamask.io/how-to/create-delegator-account#create-a-metamasksmartaccount) as a Smart Account provider.
#### Wallet configuration[](#wallet-configuration "Direct link to Wallet configuration")
Once smart accounts are enabled, you can customize the wallet configurations:
- **All supported wallets (default):** Allows users to create smart accounts using both embedded and external wallets.
- **Embedded wallets only:** Restricts Smart Account creation to only embedded wallets.
#### Configure bundler and paymaster[](#configure-bundler-and-paymaster "Direct link to Configure bundler and paymaster")
A bundler aggregates UserOperations and submits them onchain via the global EntryPoint contract. To configure the bundler:
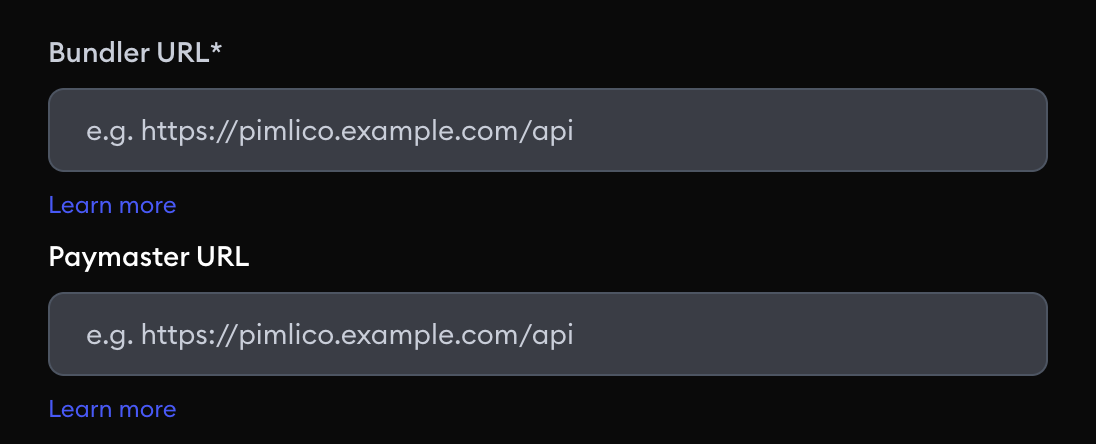
1. Navigate to the **Bundler & Paymaster** tab within the **Smart accounts** section.
2. Add the bundler URL for each supported chain.
3. Add the paymaster URL for each supported chain.
info
Currently, the sponsored paymaster can only be configured via the dashboard. For ERC-20 paymaster, refer to the SDK Configuration section below.
### Optional: SDK configuration[](#optional-sdk-configuration "Direct link to Optional: SDK configuration")
While the dashboard provides a convenient way to configure smart accounts, the SDK offers greater flexibility by allowing you to override these settings.
### Basic configuration[](#basic-configuration "Direct link to Basic configuration")
To enable smart accounts in your application, add the `accountAbstractionConfig` to your Web3Auth options:
```
import { WEB3AUTH_NETWORK, Web3AuthOptions } from '@web3auth/modal'
import { type Web3AuthContextConfig } from '@web3auth/modal/vue'
const web3AuthOptions: Web3AuthOptions = {
clientId: 'YOUR_WEB3AUTH_CLIENT_ID', // Pass your Web3Auth Client ID, ideally using an environment variable
web3AuthNetwork: WEB3AUTH_NETWORK.SAPPHIRE_DEVNET,
accountAbstractionConfig: {
smartAccountType: 'metamask',
chains: [
{
chainId: '0x1',
bundlerConfig: {
url: 'YOUR_BUNDLER_URL',
},
},
],
},
}
const web3AuthContextConfig: Web3AuthContextConfig = {
web3AuthOptions,
}
export default web3AuthContextConfig
```
### Advanced configuration: override paymaster context[](#advanced-configuration-override-paymaster-context "Direct link to Advanced configuration: override paymaster context")
You can override the paymaster context defined in the dashboard for specific chains. This is particularly useful when your paymaster requires custom settings or parameters.
```
import { WEB3AUTH_NETWORK, Web3AuthOptions } from '@web3auth/modal'
import { type Web3AuthContextConfig } from '@web3auth/modal/vue'
const web3AuthOptions: Web3AuthOptions = {
clientId: 'YOUR_WEB3AUTH_CLIENT_ID', // Pass your Web3Auth Client ID, ideally using an environment variable
web3AuthNetwork: WEB3AUTH_NETWORK.SAPPHIRE_DEVNET,
accountAbstractionConfig: {
smartAccountType: 'metamask',
chains: [
{
chainId: '0x1',
bundlerConfig: {
url: 'YOUR_BUNDLER_URL',
// This is just an example of how you can configure the paymaster context.
// Please refer to the documentation of the paymaster you are using
// to understand the required parameters.
paymasterContext: {
token: 'SUPPORTED_TOKEN_CONTRACT_ADDRESS',
sponsorshipPolicyId: 'sp_my_policy_id',
},
},
},
],
},
}
const web3AuthContextConfig: Web3AuthContextConfig = {
web3AuthOptions,
}
export default web3AuthContextConfig
```
info
The paymaster context must be manually configured for each chain that needs to be supported.
## Using smart accounts[](#using-smart-accounts "Direct link to Using smart accounts")
### Configure signer[](#configure-signer "Direct link to Configure signer")
The Web3Auth Smart Account feature is compatible with popular signer SDKs, including wagmi, ethers, and viem. You can choose your preferred package to configure the signer.
You can retreive the provider to configure the signer from Web3Auth instance.
Wagmi
Wagmi does not require any special configuration to use the signer with smart accounts. Once you have set up your Web3Auth provider and connected your wallet, Wagmi's hooks (such as useSigner or useAccount) will automatically use the smart account as the signer. You can interact with smart accounts using Wagmi just like you would with a regular EOA (Externally Owned Account) signer—no additional setup is needed.
- Viem
- Ethers
```
import { createWalletClient } from 'viem'
// Use your Web3Auth instance to retreive the provider.
const provider = web3auth.provider
const walletClient = createWalletClient({
transport: custom(provider),
})
```
```
import { ethers } from 'ethers'
// Use your Web3Auth instance to retreive the provider.
const provider = web3auth.provider
const ethersProvider = new ethers.providers.Web3Provider(provider)
const signer = await ethersProvider.getSigner()
```
### Get Smart account address[](#get-smart-account-address "Direct link to Get Smart account address")
Once the signers or Wagmi configuration is set up, it can be used to retrieve the user's Smart Account address.
- Viem
- Ethers
- Wagmi
```
// Use walletClient instance from previous step
const addresses = await walletClient.getAddresses()
const smartAccountAddress = addresses[0]
const eoaAddress = addresses[1]
```
```
// User signer from previous step
const smartAccountAddress = signer.getAddress()
```
```
import { useAccount } from 'wagmi'
const { address } = useAccount()
const smartAccountAddress = address
```
### Send transaction[](#send-transaction "Direct link to Send transaction")
Developers can use their preferred signer or Wagmi hooks to initiate onchain transactions, while Web3Auth manages the creation and submission of the UserOperation. Only the `to`, `data`, and `value` fields need to be provided. Any additional parameters will be ignored and automatically overridden.
To ensure reliable execution, the bundler client sets maxFeePerGas and maxPriorityFeePerGas values. If custom values are required, developers can use the [Viem's BundlerClient](https://viem.sh/account-abstraction/clients/bundler#bundler-client) to manually construct and send the user operation.
Since Smart Accounts are deployed smart contracts, the user's first transaction also triggers the onchain deployment of their wallet.
- Viem
- Ethers
- Wagmi
```
import { useSendTransaction } from 'wagmi'
const { data: hash, sendTransaction } = useSendTransaction()
// Convert 1 ether to WEI format
const value = web3.utils.toWei(1)
sendTransaction({ to: 'DESTINATION_ADDRESS', value, data: '0x' })
const {
data: receipt,
isLoading: isConfirming,
isSuccess: isConfirmed,
} = useWaitForTransactionReceipt({
hash,
})
```
```
// Convert 1 ether to WEI format
const amount = ethers.parseEther('1.0')
// Submits a user operation to the blockchain
const transaction = await signer.sendTransaction({
to: 'DESTINATION_ADDRESS',
value: amount,
// This will perform the transfer of ETH
data: '0x',
})
// Wait for the transaction to be mined
const receipt = await transaction.wait()
```
```
// Convert 1 ether to WEI format
const amount = parseEther('1')
// Submits a user operation to the blockchain
const hash = await walletClient.sendTransaction({
to: 'DESTINATION_ADDRESS',
value: amount,
// This will perform the transfer of ETH
data: '0x',
})
// Wait for the transaction to be mined
const receipt = await publicClient.waitForTransactionReceipt({ hash })
```
### Sign transaction[](#sign-transaction "Direct link to Sign transaction")
You can sign a transaction without immediately sending it. For the user's first transaction, the `UserOperation` calldata will automatically include the deployment data needed to create the Smart Account onchain.
info
Wagmi doesn't have hooks for signing transactions yet.
- Viem
- Ethers
```
// Convert 1 ether to WEI format
const amount = parseEther('1')
const signature = await signer.signTransaction({
to: 'DESTINATION_ADDRESS',
value: amount,
})
```
```
// Convert 1 ether to WEI format
const amount = parseEther('1')
const addresses = await walletClient.getAddresses()
const request = await walletClient.prepareTransactionRequest({
account: addresses[0],
to: 'DESTINATION_ADDRESS',
value: amount,
})
const signature = await walletClient.signTransaction(request as any)
```
### Sign message[](#sign-message "Direct link to Sign message")
Smart accounts support message signing following the EIP-1271 standard for signature verification, using the `isValidSignature` method defined in the smart contract wallet instead of the `ecrecover` function used by EOAs.
- Viem
- Ethers
- Wagmi
```
```
```
const originalMessage = 'YOUR_MESSAGE'
// Sign the message
const signedMessage = await signer.signMessage(originalMessage)
```
```
const originalMessage = 'YOUR_MESSAGE'
const addresses = await walletClient.getAddresses()
const signedMessage = await walletClient.signMessage({
account: address[0],
message: originalMessage,
})
```
### Send batch transaction[](#send-batch-transaction "Direct link to Send batch transaction")
One of the key advantages of smart accounts is the ability to execute multiple operations in a single transaction. For example, instead of requiring separate transactions for token approval and then swapping, both operations can be combined into a single UserOperation.
To perform batch transactions, you must use the `BundlerClient` provided by Web3Auth:
```
// Use your Web3Auth instance
const accountAbstractionProvider = web3auth.accountAbstractionProvider
// Use the same accountAbstractionProvider we created earlier.
const bundlerClient = accountAbstractionProvider.bundlerClient!
const smartAccount = accountAbstractionProvider.smartAccount!
// 0.00001 ETH in WEI format
const amount = 10000000000000n
const userOpHash = await bundlerClient.sendUserOperation({
account: smartAccount,
calls: [
{
to: 'DESTINATION_ADDRESS',
value: amount,
data: '0x',
},
{
to: 'DESTINATION_ADDRESS',
value: amount,
data: '0x',
},
],
})
// Retrieve user operation receipt
const receipt = await bundlerClient.waitForUserOperationReceipt({
hash: userOpHash,
})
const transactionHash = receipt.receipt.transactionHash
```
info
When calling `sendUserOperation`, it returns a UserOperation hash, not the transaction hash. To get the final transaction details, use `waitForUserOperationReceipt`.
### Send Transaction Using ERC-20 paymaster[](#send-transaction-using-erc-20-paymaster "Direct link to Send Transaction Using ERC-20 paymaster")
You can use ERC-20 tokens to pay for transaction fees instead of the native token (for example, ETH). This requires approving the token for use by the paymaster:
```
// Use your Web3Auth instance
const accountAbstractionProvider = web3auth.accountAbstractionProvider
// Use the same accountAbstractionProvider we created earlier.
const bundlerClient = accountAbstractionProvider.bundlerClient!
const smartAccount = accountAbstractionProvider.smartAccount!
// Pimlico's ERC-20 Paymaster address
const pimlicoPaymasterAddress = '0x0000000000000039cd5e8aE05257CE51C473ddd1'
// USDC address on Ethereum Sepolia
const usdcAddress = '0x1c7D4B196Cb0C7B01d743Fbc6116a902379C7238'
// 0.00001 ETH in WEI format
const amount = 10000000000000n
// 10 USDC in WEI format. Since USDC has 6 decimals, 10 * 10^6
const approvalAmount = 10000000n
const userOpHash = await bundlerClient.sendUserOperation({
account: smartAccount,
calls: [
// Approve USDC on Sepolia chain for Pimlico's ERC 20 Paymaster
{
to: usdcAddress,
abi: parseAbi(['function approve(address,uint)']),
functionName: 'approve',
args: [pimlicoPaymasterAddress, approvalAmount],
},
{
to: 'DESTINATION_ADDRESS',
value: amount,
data: '0x',
},
{
to: 'DESTINATION_ADDRESS',
value: amount,
data: '0x',
},
],
})
// Retrieve user operation receipt
const receipt = await bundlerClient.waitForUserOperationReceipt({
hash: userOpHash,
})
const transactionHash = receipt.receipt.transactionHash
```