Custom JWT Login with Embedded Wallets
Embedded Wallets supports integration with custom login providers through JWT-based authentication schemes, allowing developers to maintain their existing authentication infrastructure while leveraging Web3Auth's wallet and key management capabilities. Custom authentication can be implemented using industry-standard cryptographic algorithms such as RSA or ECDSA signatures.
To use this feature, developers must ensure that their JWTs adhere to the JWT specification. Each JWT must be signed using a private key, and its corresponding public key must be accessible via a JWKS (JSON Web Key Set) endpoint. Web3Auth will use this endpoint to verify the integrity and authenticity of incoming tokens during login.
Once the custom JWT login is working, developers can proceed to add it as a custom connection in the dashboard.
Set up a custom JWT connection
To use this feature, developers must go to the Custom Connections tab in the dashboard.
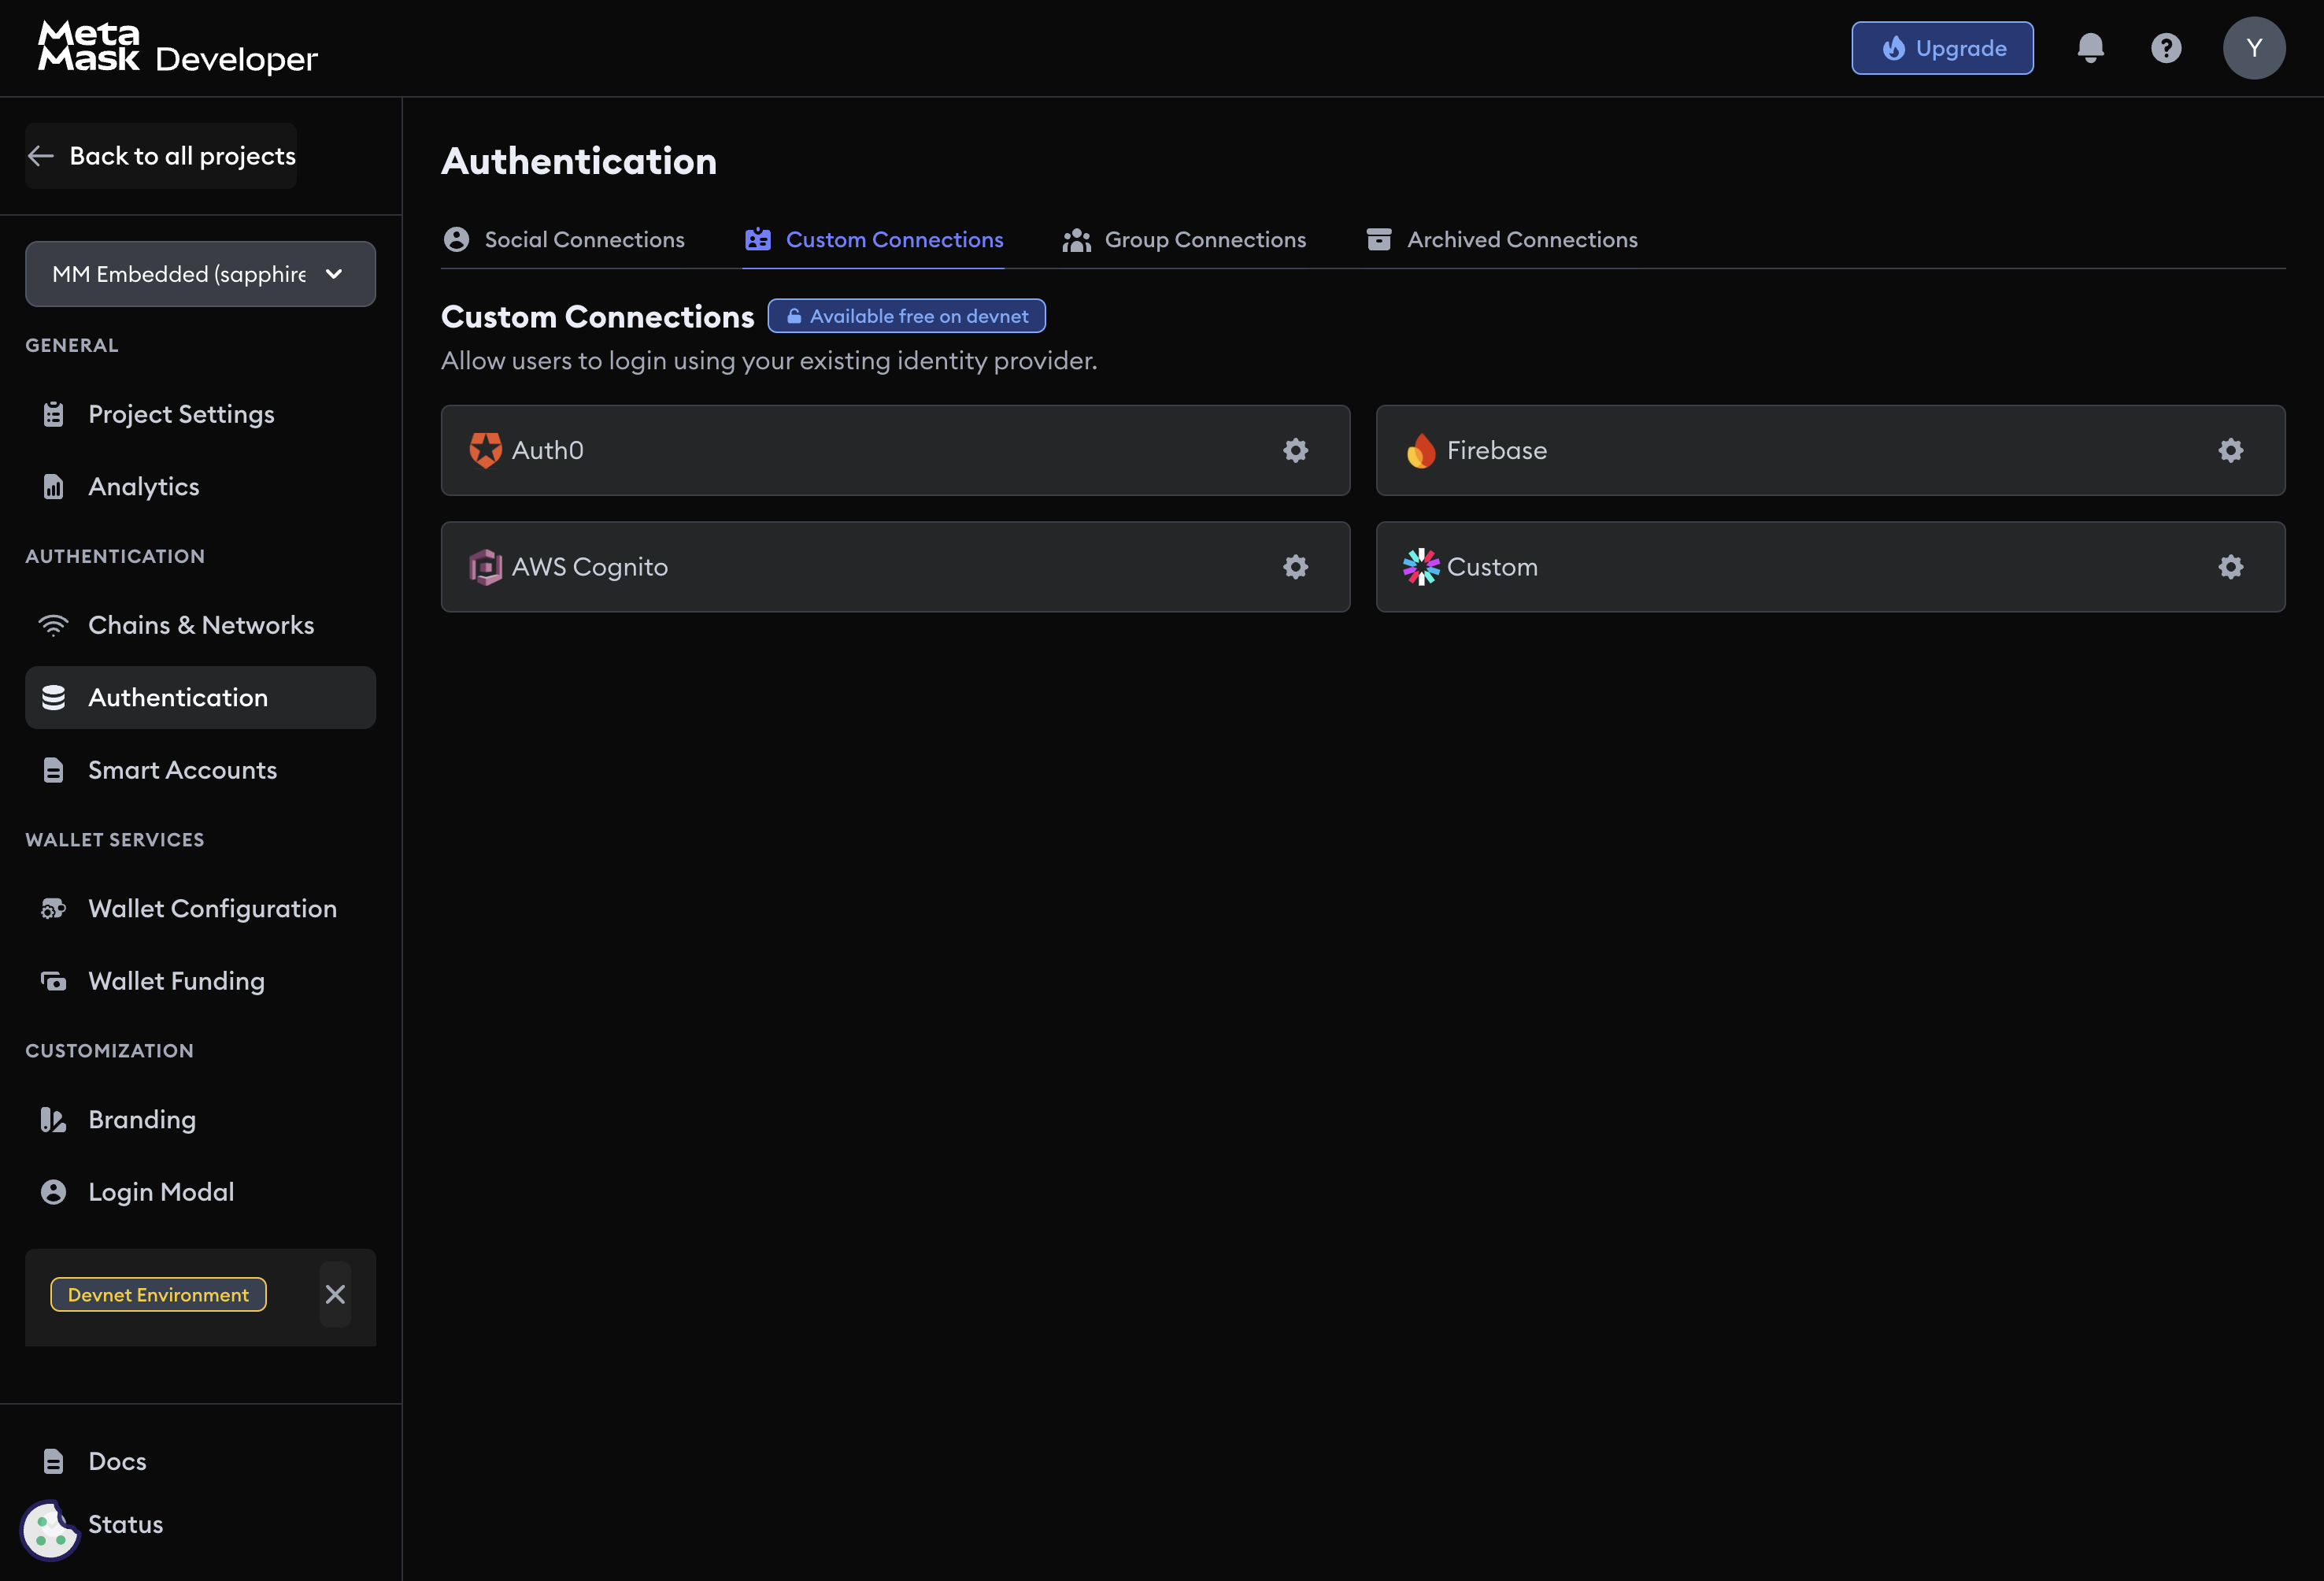
Follow these steps to create a custom JWT connection:
- Visit the Embedded Wallets dashboard.
- Go to the Custom Connections section.
- Click on the Settings icon near the Custom Connection.
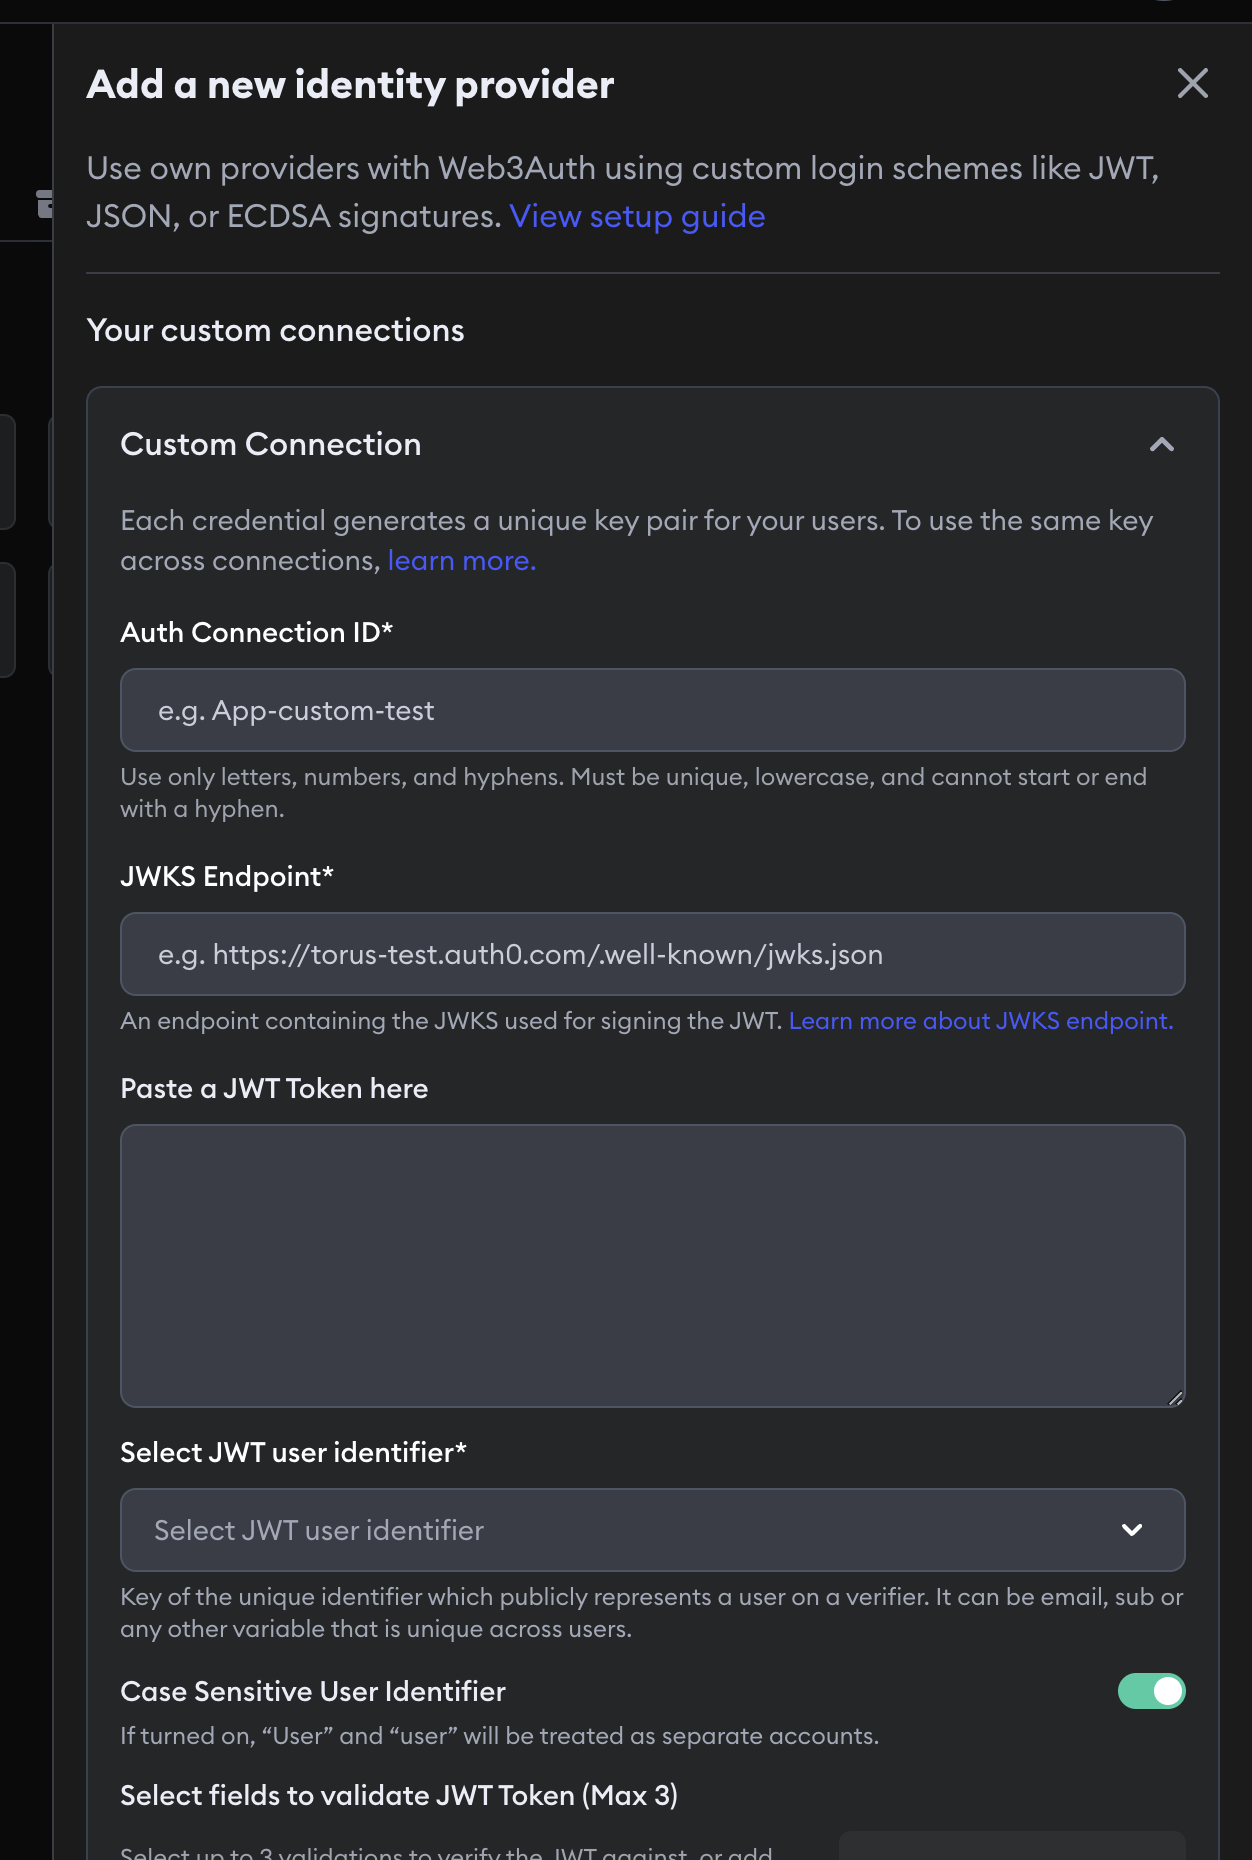
- Enter the Auth Connection ID.
- Paste the JWKS Endpoint.
- Paste a sample JWT Token to auto populate the best JWT validations possible.
- Select the JWT user identifier:
email,suborcustom. - (Optional) Toggle the case sensitivity of
User Identifier. - Click on Add Custom Validations to add validations manually.
- Type iss as a field and
your-issueras a value. - Type aud as a field and
your-audienceas a value.
- Type iss as a field and
- Click the Add Connection button to save the settings.
Create a JWT
To generate the JWT, developers may use a package of their choice. Web3Auth provides documentation and examples using both the jsonwebtoken and jose libraries.
Generate a private key
Developers can generate a private key using the openssl command-line tool. This private key will be used to sign the ID token.
- RSA256
- ECDSA
Developers can run the following command in the terminal to generate a new privateKey.pem file containing the RSA256 key details.
openssl genrsa -out privateKey.pem 2048
Once the private key is generated, developers can generate the public key which can be used to verify the JWT and convert it to JWKS.
openssl rsa -in privateKey.pem -pubout -out publicKey.pem
Developers can run the following command in the terminal to generate a new privateKey.pem file containing the ECDSA key details.
openssl ecparam -name secp256k1 -genkey -noout -out ec-secp256k1-privateKey.pem
Once the private key is generated, developers can generate the public key which can be used to verify the JWT and convert it to JWKS.
openssl ec -in ec-secp256k1-privateKey.pem -pubout -out ec-secp256k1-publicKey.pem
Install the JWT library
Developers can install a JWT library of their choice. Following are the documentation and examples using both the jsonwebtoken and jose libraries.
- npm
- Yarn
- pnpm
- Bun
npm i jsonwebtoken

npm i jose
yarn add jsonwebtoken

yarn add jose
pnpm add jsonwebtoken

pnpm add jose
bun add jsonwebtoken

bun add jose
Generate a JWT
- jsonwebtoken
- jose
Web3Auth provides documentation for using RSA256 and ECDSA—two of the most commonly used algorithms—for generating JWTs with the jsonwebtoken package. For a complete list of supported algorithms, developers can refer to the jsonwebtoken documentation.
- RSA256
- ECDSA
Developers can create an index.js file and insert the following code snippet to generate a JWT using the RSA algorithm.
import jwt from 'jsonwebtoken'
import fs from 'fs'

var privateKey = fs.readFileSync('privateKey.pem')

var token = jwt.sign(
  {
    sub: 'faj2720i2fdG7NsqznOKrthDvq43', // must be unique to each user
    name: 'Mohammad Shahbaz Alam',
    email: 'shahbaz@web3auth.io',
    aud: 'urn:my-resource-server', // -> to be used in Custom Authentication as JWT Field
    iss: 'https://my-authz-server', // -> to be used in Custom Authentication as JWT Field
    iat: Math.floor(Date.now() / 1000),
    exp: Math.floor(Date.now() / 1000) + 60 * 60,
  },
  privateKey,
  { algorithm: 'RS256', keyid: '1bb9605c36e69386830202b2d' } // <-- Replace it with your kid. This has to be present in the JWKS endpoint.
)

console.log(token)
Developers can create an index.js file and insert the following code snippet to generate a JWT using the ECDSA algorithm.
import jwt from 'jsonwebtoken'
import fs from 'fs'

var privateKey = fs.readFileSync('ec-secp256k1-privateKey.pem')

var token = jwt.sign(
  {
    sub: 'faj2720i2fdG7NsqzncndijwnKrthDvq43',
    name: 'Mohammad Shahbaz Alam',
    email: 'shahbaz@web3auth.io',
    aud: 'urn:my-resource-server', // -> to be used in Custom Authentication as JWT Field
    iss: 'https://my-authz-server', // -> to be used in Custom Authentication as JWT Field
    iat: Math.floor(Date.now() / 1000),
    exp: Math.floor(Date.now() / 1000) + 60 * 60,
  },
  privateKey,
  { algorithm: 'ECDSA', keyid: '1bb9605c36e69386830202b2d' } // <-- Replace it with your kid. This has to be present in the JWKS endpoint.
)

console.log(token)
Create an index.js file and paste the below code to generate the JWT using RSA algorithm.
import * as jose from 'jose'
import fs from 'fs'
var privateKey = fs.readFileSync('privateKey.pem')
var publicKey = fs.readFileSync('publicKey.pem')

const jwt = await new jose.SignJWT({ 'urn:example:claim': true })
  .setProtectedHeader({ alg: 'RS256', kid: '1bb9605c36e69386830202b2d' }) // <-- Replace it with your kid. This has to be present in the JWKS endpoint.
  .setIssuedAt()
  .setIssuer('https://my-authz-server')
  .setAudience('urn:my-resource-server')
  .setExpirationTime('2h')
  .sign(privateKey)

console.log(jwt)

// Verifying the JWT using Remote JWK Set.
// This is just to show how the Verify works, look above to set-up custom jwt verifier on the Embedded Wallets dashboard.
// Check the steps below to see how once can generate the JWKS
const JWKS = jose.createRemoteJWKSet(new URL('https://my-authz-server/.well-known/jwks.json'))

const { payload, protectedHeader } = await jose.jwtVerify(jwt, JWKS, {
  issuer: 'https://my-authz-server',
  audience: 'urn:my-resource-server',
})

console.log(protectedHeader)
console.log(payload)
Check out the troubleshooting page.
Usage
Since the Custom Connection details are available from the dashboard, developers don't need to pass any additional parameters to the Web3AuthProvider.
Follow our quickstart to set up the basic flow.
Log in with JWT
const getIdToken = async () => {
  // Get id token from server
  const res = await fetch('http://localhost:8080/api/token', {
    method: 'POST',
    headers: {
      'Content-Type': 'application/json',
    },
  })
  const data = await res.json()
  return data?.token
}

const loginWithJWT = async () => {
  try {
    const idToken = await getIdToken()

    await connectTo(WALLET_CONNECTORS.AUTH, {
      authConnection: AUTH_CONNECTION.CUSTOM,
      authConnectionId: 'w3a-node-demo',
      idToken,
      extraLoginOptions: {
        isUserIdCaseSensitive: false,
      },
    })
  } catch (err) {
    console.error(err)
  }
}
What are JWKS?
JWKS stands for JSON Web Key Set. It's a set of keys containing the public keys that should be used to verify any JSON Web Token (JWT) issued by the authorization server and signed using the RS256 signing algorithm.
How to create JWKS?
-
Most of the login providers that support JWT-based login will provide you this URL, such as Firebase, Google, Auth0, AWS Cognito etc.
- Firebase:
https://www.googleapis.com/service_accounts/v1/jwk/{your-project-id} - Auth0:
https://{your-domain}/.well-known/jwks.json - Google:
https://www.googleapis.com/oauth2/v3/certs - AWS Cognito:
https://cognito-idp.{region}.amazonaws.com/{userPoolId}/.well-known/jwks.json
- Firebase:
-
If you are using your own custom JWT, you will need to convert your PEM file to JWKS.
How to convert PEM to JWKS
If you're using jose or jsonwebtoken library, you can use the following steps to convert your PEM file to JWKS.
-
Create a Private Key using openssl.
openssl genrsa -out privateKey.pem 2048This privateKey will be used to sign the token.
-
Using the above privateKey.pem file, create a Public Key.
openssl rsa -in privateKey.pem -pubout -out publicKey.pemThis publicKey.pem file will be converted to JWKS.
-
Convert the publicKey.pem file to JWKS.
Now, look for a tool that converts
.pemtojwk(s)format.-
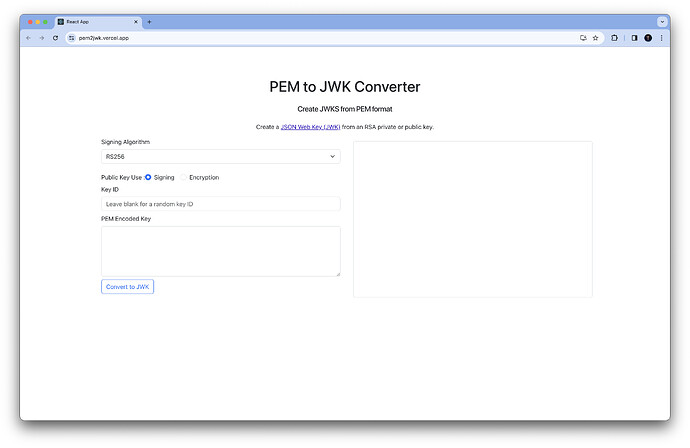
One of the tools is https://pem2jwk.vercel.app/
- Select Signing Algorithm:
RS256 - Select Public Key Use:
Signing - Key ID:
paste-yoursor leave it blank to generate a random one. - PEM encoded key:
{paste-the-publicKey-pem-file-s-content-here}
- Select Signing Algorithm:
-
Click on the Convert to JWK button.
-
-
To complete the process, you need to save the output as a
.jsonfile, host it on your server, and make sure it's publicly accessible.This will give you the
JWKS Endpoint, which is required when setting up a Custom JWT Verifier on the Embedded Wallets dashboard.